In the realm of software infrastructure, there exists a clear demarcation: platforms that are developer-centric and self-serving, and those that are not. This distinction is what sets apart industry leaders, including both established hyperscalers and companies like Cloudflare, Fastly, Vercel, & Netlify. While challenging the dominance of hyperscalers might seem daunting, competing effectively against the likes of Cloudflare and its peers is not only feasible but within reach. The reason? You likely possess the hardware—potentially superior and more geographically diverse than theirs. The key ingredient missing is a developer-friendly, self-serving platform. Traditionally, crafting such a platform demanded years and significant investment in skilled engineering talent. However, I’m here to guide you through an alternative pathway that can swiftly bring you online and ensure production readiness.
As the founder of Taubyte, I am driven by the vision to democratize cloud computing, making it as accessible as possible. Achieving this vision entails developing infrastructure software that’s easy to deploy and maintain. An added bonus in our approach is our commitment to preventing vendor lock-in; hence, our core technology is open-sourced. Our mission is not just about providing tools but ensuring that these tools are readily accessible, ensuring freedom and flexibility for developers everywhere.
Truly a No-Brainer to Build a Cloud!
Observing the technological fortresses erected by Fastly, Vercel, Cloudflare, and others can indeed be daunting. They’ve amassed vast codebases and teams of skilled engineers dedicated to constant improvement and maintenance. However, the sheer size of their infrastructure also presents a significant challenge—it’s not easy to pivot quickly or innovate in ways that might render their existing systems obsolete due to internal inertia.
Enter the simplest incarnation of a Taubyte Cloud, we call dreamland, which runs directly on your computer.
Start by installing it with the following command:
$ npm i @taubyte/dream
With the dream command-line tool now at your disposal, let’s initiate your personal cloud:
$ dream new multiverse
[INFO] Dreamland ready
[SUCCESS] Universe blackhole started!
Any
ERRORmessages related toseercan be disregarded at this stage.
The SUCCESS notification confirms the operational status of your cloud. Proceed by navigating to console.taubyte.com and selecting the Dreamland button to interact with your new cloud environment.

This button becomes interactive only when Dreamland is detected.
Next steps involve the web console’s sidebar: (1) select Network, followed by (2) blackhole.
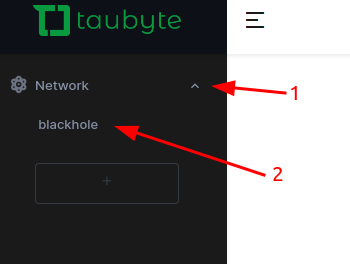
Shortly, you’ll be presented with a view resembling the following:

What you’re witnessing is a constellation of virtual nodes, together forming a Cloud Computing Platform. This platform is equipped for serverless computing, web hosting, storage solutions, databases, pub-sub mechanisms, and much more.
Remarkably, this cloud is immediately available for developer engagement, accessible either via the command-line or the Web Console.
For an in-depth exploration of Dreamland and the Web Console, I recommend delving into the Introduction to Taubyte, an essential read.
Pick a Domain
Every Taubyte Cloud is associated with a Fully Qualified Domain Name (FQDN). Essentially, you can use any domain or sub-domain that you control. For instance, I’ve chosen enterprise.starships.ws for Starship Enterprise’s Web Services.
Developers often require a temporary sub-domain for testing purposes. You’re free to use a sub-domain of your main domain or opt for an entirely different one. While g.enterprise.starships.ws or el.starships.ws are valid options, my passion for Sci-Fi inspires me to select e.ftll.ink (Enterprise’s Faster Than Light Link).
Get Your Infrastructure Ready
The choice of infrastructure is yours to make. The only requirement is hosts (either bare metal or VMs) running Ubuntu 22.04. While any number of hosts can work, I recommend starting with three, each equipped with:
- A public IP
- +8GB of RAM
For demonstration purposes, I quickly provisioned 3 VMs across various locations:
| Name | Location | IP |
|---|---|---|
| host-001-enterprise-starships-ws | Iowa | 34.133.173.124 |
| host-002-enterprise-starships-ws | Toronto | 34.130.131.76 |
| host-003-enterprise-starships-ws | Los Angeles | 35.235.122.141 |
Note: This cloud setup is temporary and will eventually be decommissioned. However, it will remain accessible for testing by developers for as long as it’s operational.
Firewall Configuration
Ensure the following ports are open to facilitate communication and service delivery:
| Ports | Protocols | Description |
|---|---|---|
| 4242, 4247, 4252 | TCP | For Peer-to-peer communication and IPFS. |
| 80, 443 | TCP | For HTTP and HTTPS - serving APIs and hosted resources. |
| 53, 953 | TCP, UDP | For DNS resolution. |
Preparing the Hosts
Before proceeding with the tau installation on the hosts, a few preliminary steps are required:
Installing curl & vim
Ensure curl and vim (or your preferred text editor) are installed:
$ sudo apt update
$ sudo apt install curl vim
If you’re unfamiliar with
vim, consider trying vim-adventures for a fun introduction.
Freeing Up DNS Ports
To allow the seer protocol to operate correctly, DNS settings need adjustment:
$ sudo vim /etc/systemd/resolved.conf
In edit mode (:i), configure:
DNS=1.1.1.1
DNSStubListener=no
Then, apply the changes:
$ sudo systemctl restart systemd-resolved.service
$ sudo ln -sf /run/systemd/resolve/resolv.conf /etc/resolv.conf
Docker Installation
Execute the following to install Docker:
$ curl -fsSL https://get.docker.com | sh
Setting Up the First Host
The initial host, in this scenario host-001-enterprise-starships-ws, will serve as the cornerstone for generating our network’s secrets.
Installing Tau
The installation of the tau software is straightforward. Execute the command below:
$ curl https://get.tau.link/tau | sh
It’s worth noting that a single host can support multiple nodes, provided their ports do not overlap. However, for the purposes of this guide, we will maintain a one-node-per-host configuration.
Upon successful installation, you should see an output similar to the following:
  % Total    % Received % Xferd  Average Speed   Time    Time     Time  Current
                                 Dload  Upload   Total   Spent    Left  Speed
100  3982  100  3982    0     0   3962      0  0:00:01  0:00:01 --:--:--  3966
Downloading release: v1.1.2
From: https://github.com/taubyte/tau/releases/download/v1.1.2/tau_1.1.2_linux_amd64.tar.gz
######################################################################## 100.0%
Installation complete
This signifies that tau has been successfully installed and is ready for configuration and use.
Configuring Your Node
The configuration process for a node is straightforward and can be executed with a single command:
$ sudo tau config generate -n enterprise.starships.ws \
      -s compute --protos all --ip 34.133.173.124 \
      --dv --swarm
Here’s a quick rundown of the options used:
-nspecifies the domain name (or network name) for the node.-sassigns a name to this configuration, often referred to as a “shape.”--protos allactivates all available protocols.--ipindicates the IP address the node should use for announcements.--dvgenerates a domain validation key pair.--swarmcreates a swarm key for network clustering.
Note: It’s generally not advisable to enable all protocols on a single node due to potential conflicts and resource constraints. This article simplifies the setup for demonstration purposes. Adjustments to the protocol configuration can easily be made with a single command, which we will explore in future discussions.
Upon successful configuration, you’ll receive the node’s ID as confirmation:
[INFO] ID: 12D3KooWKv5oNF2a6h9sYzRUPEAaYe6feTbBbcLYZYVFrMDDCHzY
Fine-tuning the Configuration
With the basic configuration in place, some adjustments are necessary for optimal performance and alignment with your specific requirements:
$ sudo vi /tb/config/compute.yaml
For instance, you might want to update the generated domain to match your preferred domain. In this example, I’ll use e.ftll.ink:
generated: e.ftll.ink
Additionally, since the gateway and substrate protocols cannot coexist on the same node, we’ll remove the gateway protocol from our list. The revised configuration should look something like this:
privatekey: <redacted>
swarmkey: keys/swarm.key
protocols:
    - auth
    - patrick
    - monkey
    - tns
    - hoarder
    - substrate
    - seer
p2p-listen:
    - /ip4/0.0.0.0/tcp/4242
p2p-announce:
    - /ip4/34.133.173.124/tcp/4242
ports:
    main: 4242
    lite: 4247
    ipfs: 4252
location:
    lat: 40.076897
    long: -109.33771
network-fqdn: enterprise.starships.ws
domains:
    key:
        private: keys/dv_private.pem
        public: keys/dv_public.pem
    generated: e.ftll.ink
plugins: {}
Should the location be inaccurately determined, you have the option to correct it manually. The final step involves validating the configuration to ensure its accuracy and completeness:
$ sudo tau conf validate -s compute
A lack of error messages signifies that your configuration is correct.
Manually Starting the Node
To initiate the node manually, execute the following command:
$ sudo tau start -s compute
Next, verify that your node is active and accessible. Open your web browser and navigate to slimdig.com. There, you’ll perform a simple check: (1) input seer.tau.<your domain>, (2) enter your server’s public IP, and (3) click on the A button.
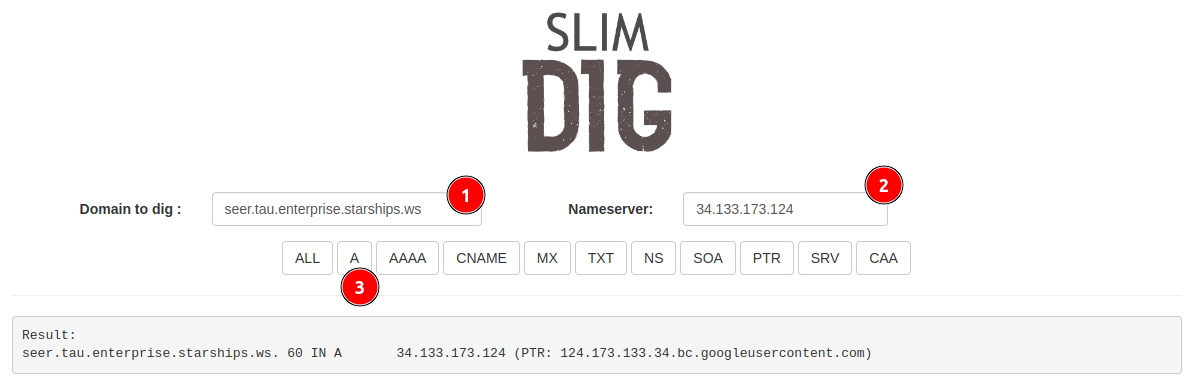
Seeing your server’s IP address as a return verifies that your node is live and operational.
Transitioning to a Systemd Service
For a more resilient setup, converting the manually started service into a systemd service ensures that it will automatically restart upon failure or server reboot.
First, halt the currently running service by using CTRL-C. Then, proceed to create a systemd service file:
$ sudo vim /lib/systemd/system/tau@.service
Incorporate the following configuration into your systemd service file:
[Unit]
Description=Taubyte Tau Service Running %i

[Service]
Type=simple
ExecStart=/tb/bin/tau start -s %i
StandardOutput=journal
User=root
Group=root

LimitAS=infinity
LimitRSS=infinity
LimitCORE=infinity
LimitNOFILE=65536

Restart=always
RestartSec=1

[Install]
WantedBy=multi-user.target
After saving the file, enable and initiate the service to ensure it starts automatically:
$ sudo systemctl enable tau@compute
$ sudo systemctl start tau@compute
To confirm the service is running as expected, check its status:
$ sudo systemctl status tau@compute
You should see output similar to the following, indicating that the tau@compute service is active and running:
● tau@compute.service - Taubyte Tau Service Running compute
     Loaded: loaded (/lib/systemd/system/tau@.service; enabled; vendor preset: enabled)
     Active: active (running) since Fri 2024-02-09 22:43:52 UTC; 1min 5s ago
   Main PID: 4588 (tau)
      Tasks: 14 (limit: 38492)
     Memory: 202.0M
        CPU: 53.521s
     CGroup: /system.slice/system-tau.slice/tau@compute.service
             └─4588 /tb/bin/tau start -s compute

Feb 09 22:43:52 host-001-enterprise-starships-ws systemd[1]: Started Taubyte Tau Service Running compute.
This service configuration ensures your node remains operational across restarts and system updates, providing a stable and reliable infrastructure component.
Configuring DNS for Load Balancing
The Seer protocol plays a crucial role in DNS load balancing within the Taubyte ecosystem, enabling protocol translation into valid IP addresses using the <protocol>.tau.<domain> convention. This powerful feature allows for efficient load balancing across a Taubyte-based cloud with just a simple CNAME (or ALIAS, for DNS providers that support it) record.
Delegating the tau Subdomain
To leverage this capability, it’s necessary to delegate the tau subdomain to the nodes running the Seer protocol within your cloud. Here’s how you can do this with your DNS provider; the example below uses Namecheap for the domain starships.ws:
Adding the Node as an A Record:
- Select the A record type.
- Name it (in this case,
seer.<domain>). - Enter the IP address of the node.
- Confirm by validating the entry.

Delegating with an NS Record:
- Choose the NS record type for delegation.
- Label it
tau.<domain>. - Set its value to your chosen name (e.g.,
seer.<domain>). - Validate the entry to complete the delegation.

Verifying the Configuration
To ensure the DNS configuration is effective, use a tool like slimdig:
- Enter
<protocol>.tau.<domain>(for this demonstration,tns.tau.enterprise.starships.ws). - Ensure the query is set to a public DNS server like 8.8.8.8.
- Click on the
Abutton to perform the lookup.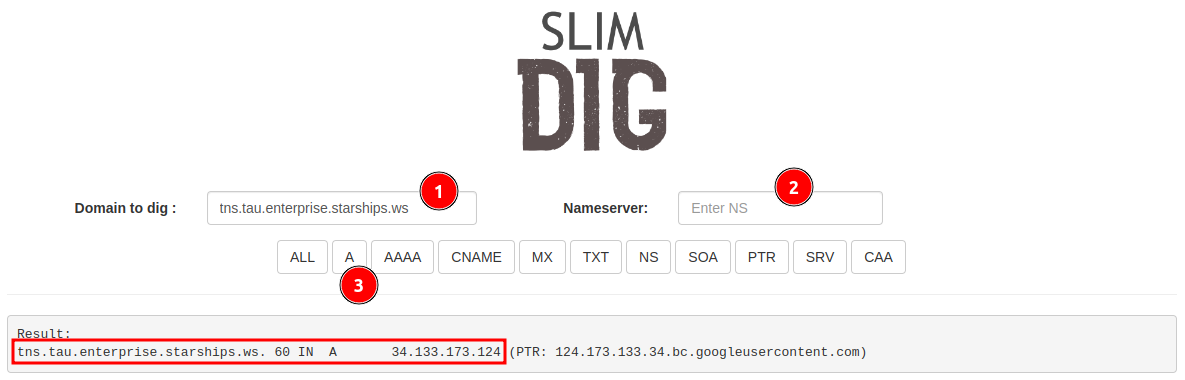
Keep in mind, DNS propagation can delay the effectiveness of these new entries, requiring multiple attempts over several minutes to verify.
Congratulations, your cloud is now operational! You can connect to it via tau-cli or the Web Console to deploy frontend interfaces, serverless computing functions, and more. The next steps will involve bringing the remaining two servers online to enhance our cloud’s resilience and capacity.
Shadow Clone Jutsu: Cloning the Setup
To efficiently replicate our initial setup across two additional hosts, we’ll first create a configuration template. This approach ensures consistency, particularly concerning the swarm key and domain validation keys.
Exporting the Configuration Template
Initiate the export with the following command, which will encrypt the secrets for added security:
$ sudo tau config export -s compute --protect
You’ll be prompted to enter a password for the encryption:
Password?
Remember this password; it’s crucial for the subsequent steps.
The exported configuration will resemble the following (omit the location to let it be automatically determined for the other nodes):
origin:
  shape: compute
  host: host-001-enterprise-starships-ws
  time: 2024-02-12T05:41:25.218338331Z
  protected: true
source:
  swarmkey: PZuGcV96BbfM...2RE8ZEfR2pZoM29z8
  protocols:
  - auth
  - patrick
  - monkey
  - tns
  - hoarder
  - substrate
  - seer
  p2p-listen:
  - /ip4/0.0.0.0/tcp/4242
  p2p-announce:
  - /ip4/34.133.173.124/tcp/4242
  ports:
    main: 4242
    lite: 4247
    ipfs: 4252
  network-fqdn: enterprise.starships.ws
  domains:
    key:
      private: BDN9SEUFsolg...25pUUrUpFxSFhjlCv
      public: cmS5kmov/cJ9...NezzWwcYVj4YVNOg
    generated: e.ftll.ink
  plugins: {}
To facilitate the bootstrap process for the additional nodes, retrieve the first node’s multi-address:
$ sudo tau config show -s compute | grep Announce
The output should provide the address necessary for peer connections:
│ P2PAnnounce │ /ip4/34.133.173.124/tcp/4242/p2p/12D3KooWKv5oNF2a6h9sYzRUPEAaYe6feTbBbcLYZYVFrMDDCHzY │
In this case, the multi-address is:
/ip4/34.133.173.124/tcp/4242/p2p/12D3KooWKv5oNF2a6h9sYzRUPEAaYe6feTbBbcLYZYVFrMDDCHzY
Preparing the Additional Hosts
Establish SSH connections to the remaining two hosts, ensuring they are prepared as described in the Preparing the Hosts section. Transfer the compute.tmpl.yaml template (minus the location) and the systemd service file to each.
Installing Tau
On each of the new hosts, install tau using the same command as before:
$ curl https://get.tau.link/tau | sh
This step lays the foundation for a streamlined expansion of your Taubyte cloud, leveraging the power of configuration templates and ensuring a uniform setup across your infrastructure.
Configuring the Additional Hosts
With the template and necessary preparations in place, proceed to configure the additional hosts:
- For the Second Host:
$ sudo tau config gen --ip 34.130.131.76 --use compute.tmpl.yaml --bootstrap /ip4/34.133.173.124/tcp/4242/p2p/12D3KooWKv5oNF2a6h9sYzRUPEAaYe6feTbBbcLYZYVFrMDDCHzY
- **For the Third Host:**
    ```sh
    $ sudo tau config gen --ip 35.235.122.141 --use compute.tmpl.yaml  --bootstrap /ip4/34.133.173.124/tcp/4242/p2p/12D3KooWKv5oNF2a6h9sYzRUPEAaYe6feTbBbcLYZYVFrMDDCHzY
Important considerations:
- Utilize the correct IP addresses for each host.
- The template’s encryption password will be required.
- Each host is bootstrapped to the initial node, ensuring connectivity and synchronization within the network.
Systemd Setup
After configuration, ensure the tau service will automatically start on each host:
$ sudo cp ~/tau@.service /lib/systemd/system/tau@.service
$ sudo systemctl enable tau@compute
$ sudo systemctl start tau@compute
Verify the service status to confirm active running:
$ sudo systemctl status tau@compute
DNS Verification
To ensure all nodes are correctly registered and operational, utilize DNS queries:
- Enter
<protocol>.tau.<domain>and selectAto perform the query.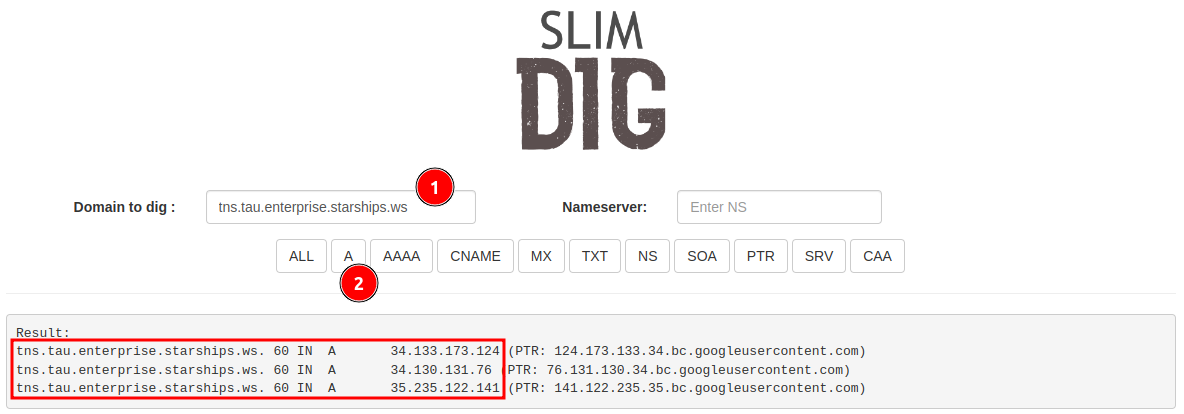
You should observe all three servers listed, indicating successful network integration.
Final Adjustments
With the cloud infrastructure now horizontally expanded and operational, attention turns to ensuring seamless interaction among all hosts and leveraging their capabilities for DNS load balancing.
DNS Adjustments
- For the Main Domain: Additional
Arecords for each new host need to be added to the DNS configuration.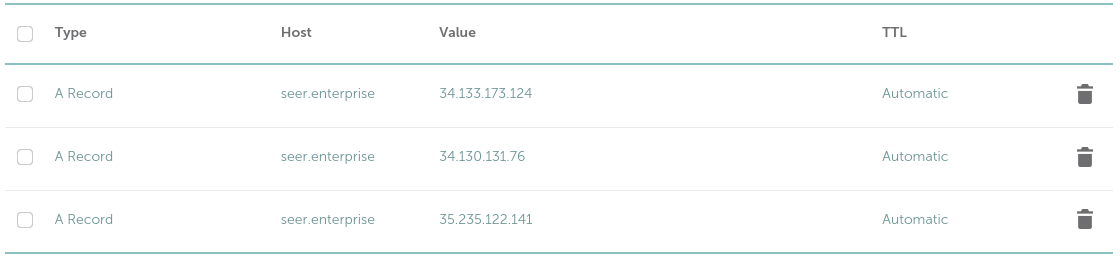
Running a DNS lookup should now reflect all active hosts:
- For the Generated Domain: Delegate the specified subdomain to your cloud by adding the appropriate
NSentry, enhancing domain management and flexibility.
Bootstrapping for Recovery and Expansion
Ensure all nodes are aware of each other to facilitate network resilience and data consistency:
- Collect and share the multi-addresses among all nodes.
- Update the
peerssection in each node’s configuration to include all peers. - Validate the configuration for accuracy.
No restart is required as peers are dynamically managed, but ensuring accurate configuration enhances the network’s ability to recover and scale effectively.
Configure them
To extend our cloud’s reach, we proceed to configure the additional nodes with precision, ensuring a seamless integration into our existing setup. Execute the following commands on the designated hosts to generate their configurations, employing the compute.tmpl.yaml as a blueprint and leveraging the bootstrap mechanism for network connectivity:
On the Second Host:
$ sudo tau config gen --ip 34.130.131.76 --use compute.tmpl.yaml --bootstrap /ip4/34.133.173.124/tcp/4242/p2p/12D3KooWKv5oNF2a6h9sYzRUPEAaYe6feTbBbcLYZYVFrMDDCHzY[INFO] ID: 12D3KooWSJZQAPtVaLuusfr3g71FZEeyxr8HdmPcjKeQonHmQXn2On the Third Host:
$ sudo tau config gen --ip 35.235.122.141 --use compute.tmpl.yaml --bootstrap /ip4/34.133.173.124/tcp/4242/p2p/12D3KooWKv5oNF2a6h9sYzRUPEAaYe6feTbBbcLYZYVFrMDDCHzY
**Important**: Use the correct IP addresses for each host and the first node's multi-address for initial discovery. You'll be prompted to enter the password established during the template creation phase—this step is crucial for maintaining security and consistency across your cloud infrastructure.

### Setup systemd
To ensure our nodes remain resilient and automatically recover from reboots or unforeseen downtime, we embrace systemd's robustness. On both nodes, execute the following:

```sh
$ sudo cp ~/tau@.service /lib/systemd/system/tau@.service
$ sudo systemctl enable tau@compute
$ sudo systemctl start tau@compute
Verify the service’s heartbeat:
$ sudo systemctl status tau@compute
Check with DNS
A litmus test for operational integrity, DNS queries reveal the network’s pulse. Employ <protocol>.tau.<domain> and observe:
The triad of servers, now visible, confirms our cloud’s expanded horizon.
Final touches
With our cloud now stretching across horizons, it’s paramount to ensure inter-node discovery and dynamic load balancing. Our next steps solidify the network’s backbone, priming it for seamless scalability.
DNS
Main Domain
Augmenting our DNS configuration to include all nodes under seer.<domain> enriches our network’s resilience:
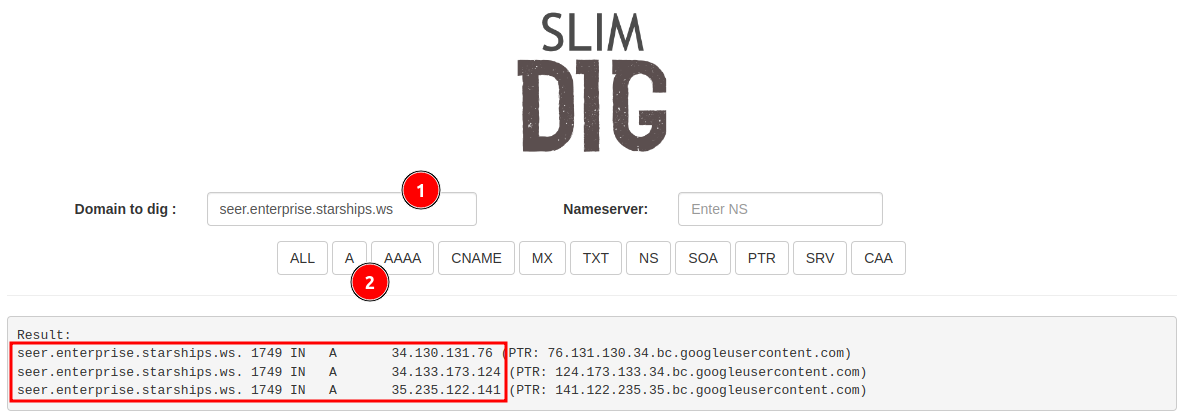
A subsequent dig command unfurls the network’s canvas, displaying our nodes in unison:
For those wielding Linux, dig a seer.enterprise.starships.ws +noall +answer yields an ensemble of IPs, signifying our united front.
Generated Domain
Recall our s.ftll.ink domain, a digital expanse awaiting its purpose. An NS entry, pointing to our cloud, bestows it with life:
Bootstrapping
In the realm of distributed systems, autonomy is king. Ensuring each node can independently find its brethren guarantees our network’s resilience. With the multi-addresses of all nodes now known, we weave them into each node’s fabric:
peers:
  - /ip4/34.133.173.124/tcp/4242/p2p/12D3KooWKv5oNF2a6h9sYzRUPEAaYe6feTbBbcLYZYVFrMDDCHzY
  - /ip4/34.130.131.76/tcp/4242/p2p/12D3KooWHrp2t9npN2TW4dv47uEvJh6qfs6U2ymhkiVVNpcR3cWE
  - /ip4/35.235.122.141/tcp/4242/p2p/12D3KooWKQJfLU74VJzsvhAKUJ8KQidBr1CowMo1e1YRrSb2v

TZd
A final validation ensures our network’s readiness to face the digital expanse:
$ sudo tau config check -s compute
No error messages? Then stand back and behold—a cloud, not just built, but crafted, ready to rival the titans.
Restart?
No need for manual restarts. The peer connections are maintained in a persistent database, ensuring that even after recovery or reconfiguration, the nodes automatically recognize each other without intervention.
Let’s Try the Cloud!
Congratulations, your very own cloud infrastructure is now operational, poised to compete with giants like Cloudflare, Netlify, Vercel, and Fastly. Let’s walk through a hands-on tour to see it in action.
Login Procedure
Embark on your cloud journey by navigating to console.taubyte.com in your web browser, Chrome recommended for optimal experience. Follow these steps to login:
Select Network: Click on the dropdown list under the email input field, then select
Custom.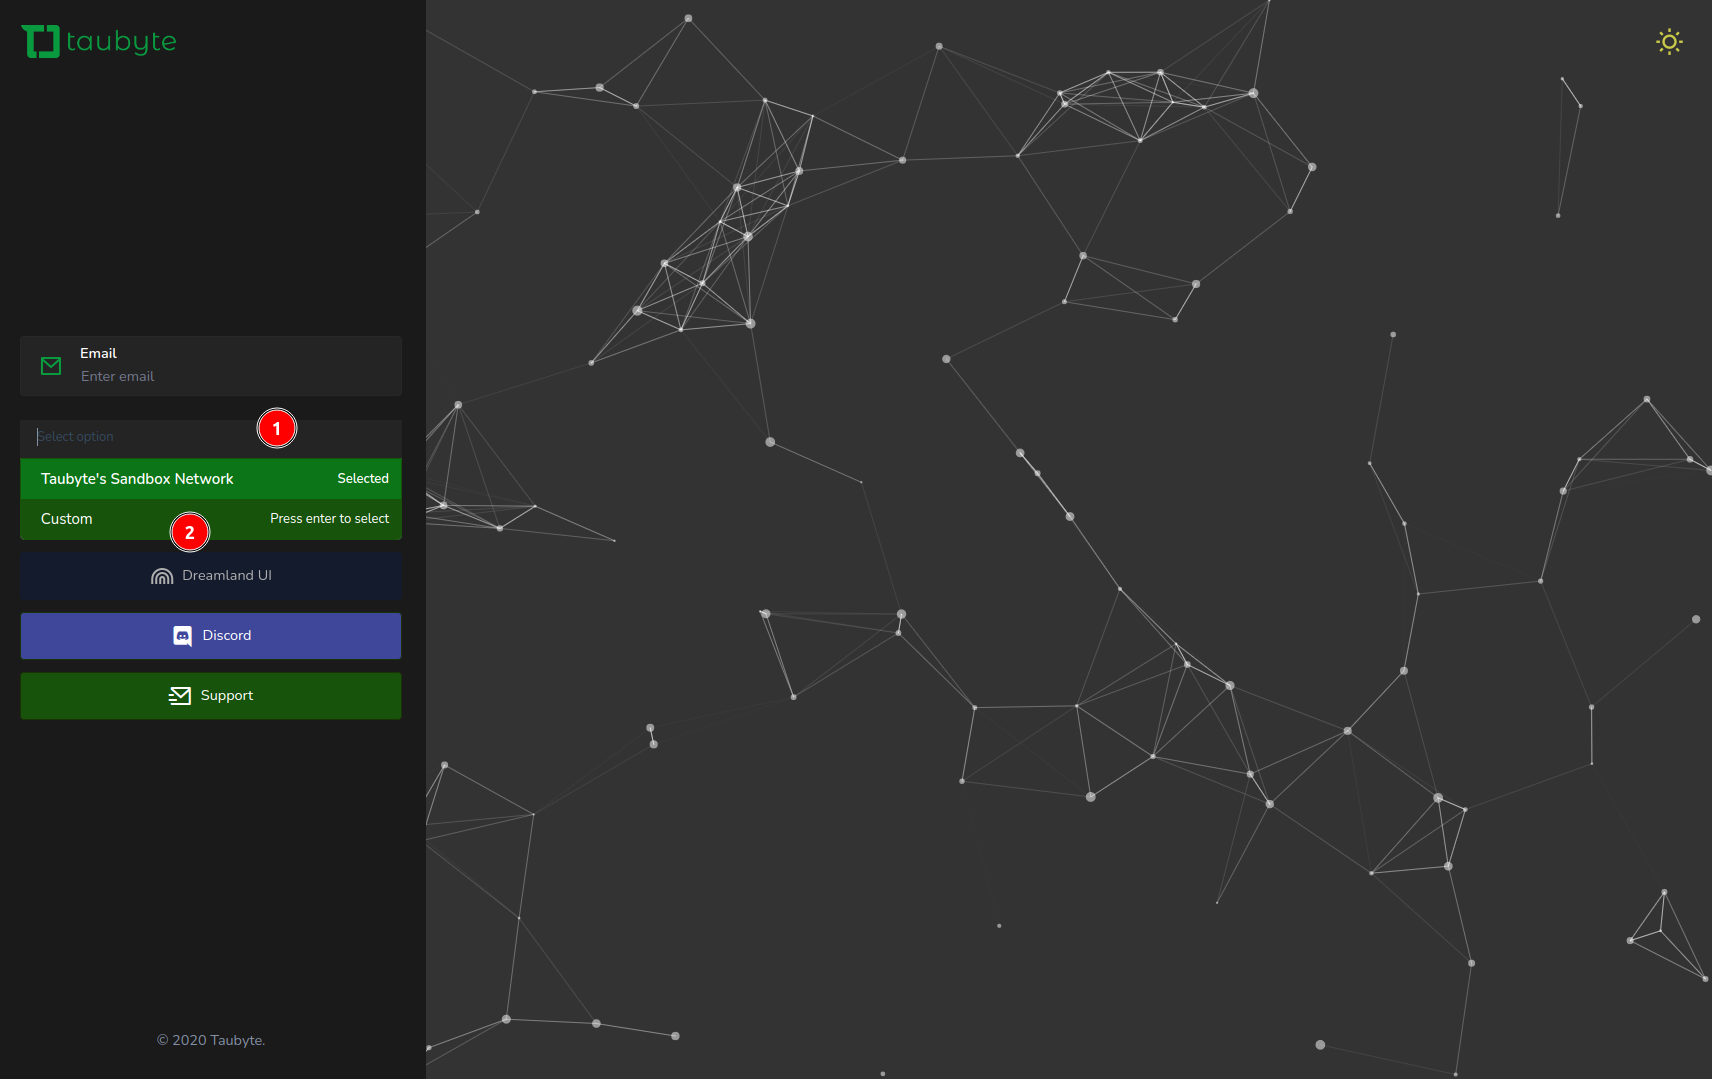
Enter Your Domain: In the modal that appears, type your domain (in this example,
enterprise.starships.ws) and confirm by clicking the check mark button.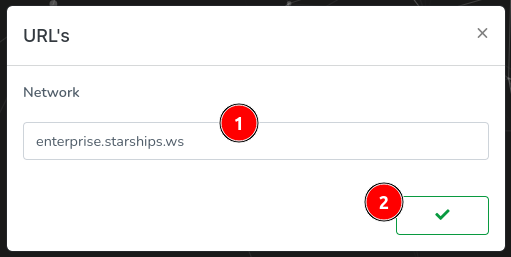
Login with GitHub: With your domain now recognized, enter your email and click on
Login with Github.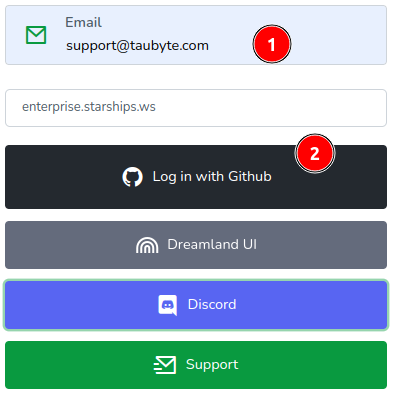
This action will redirect you to GitHub, where you’ll need to authorize the web application to access your repositories. Rest assured, the token generated during this process is securely stored in your web browser only.
Create a Project
Once logged in, you’ll land on the projects page. Here, (1) click on the “+” button to initiate a new project creation.
![]()
In the modal that appears, you’re prompted to define your project: (1) Enter the project’s name, (2) provide a description, (3) decide whether the repositories related to this project should be private, and finally, (4) click on “Create project” to seal the deal.

Successfully doing so will generate two repositories on GitHub for you—one for configuration and another for what we term as inline code.
Following a successful creation, you’ll be navigated to the dashboard showcasing:
- Project Dashboard
- Node locations
- Commit history
- Git Branch
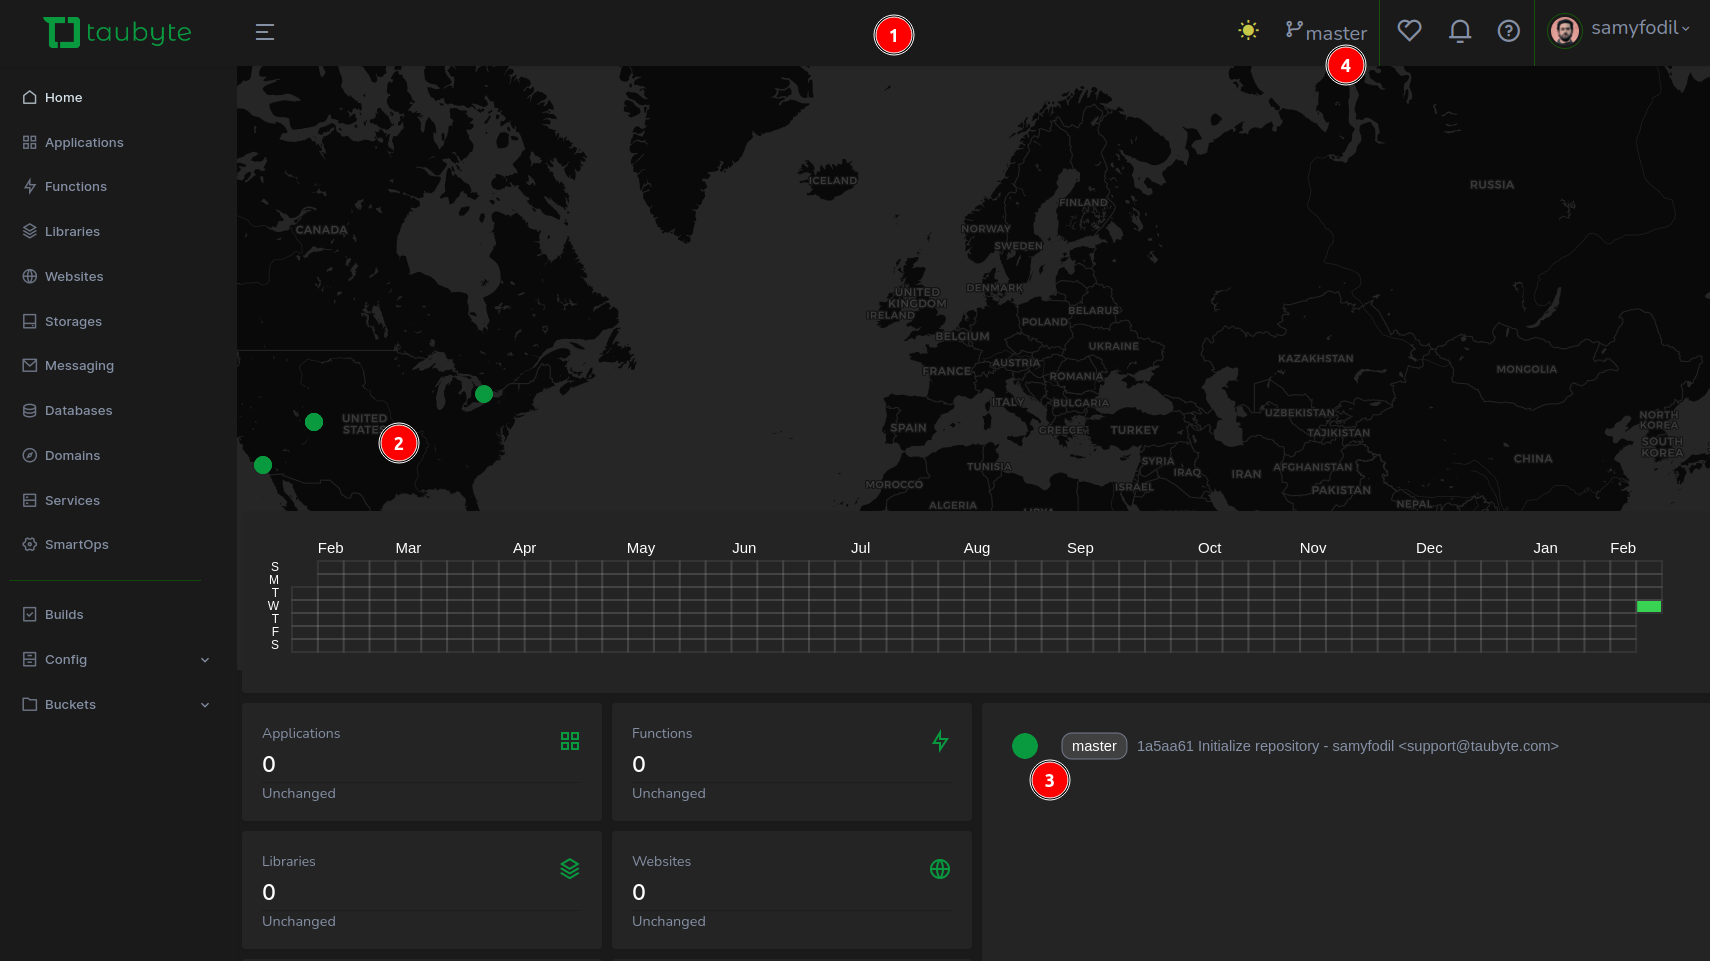
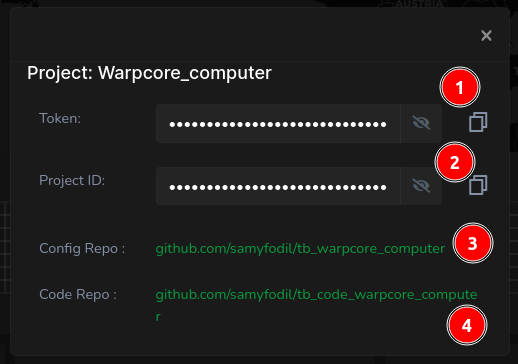
For more details, (1) click on your avatar icon then (2) select Project Details.

This modal provides essential details such as:
- Your GitHub token, handy for CLI usage
- Your project ID
- The repository holding configuration files
- The repository for inline function code
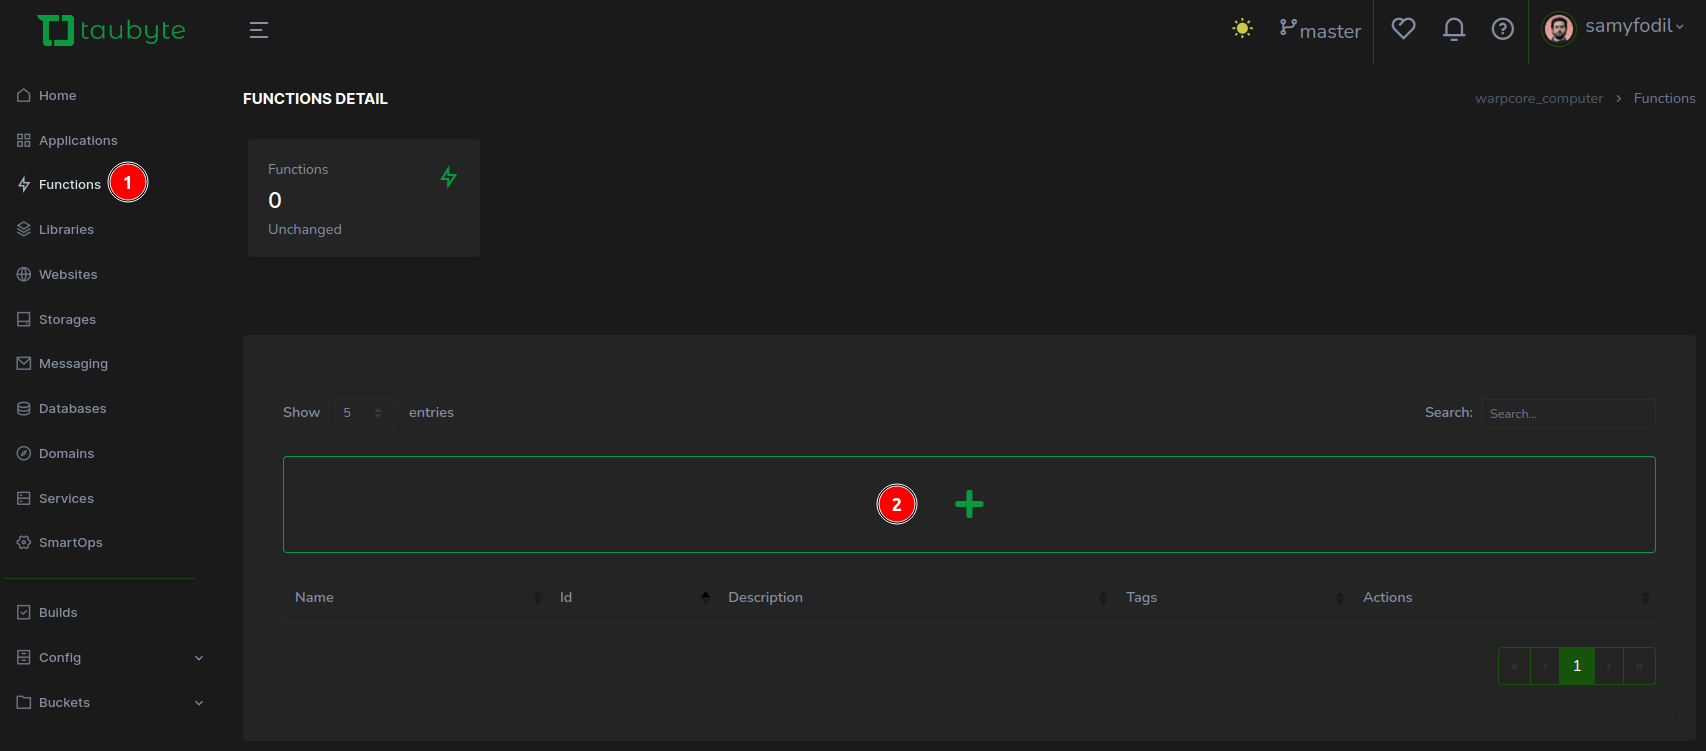
Create a Serverless Function
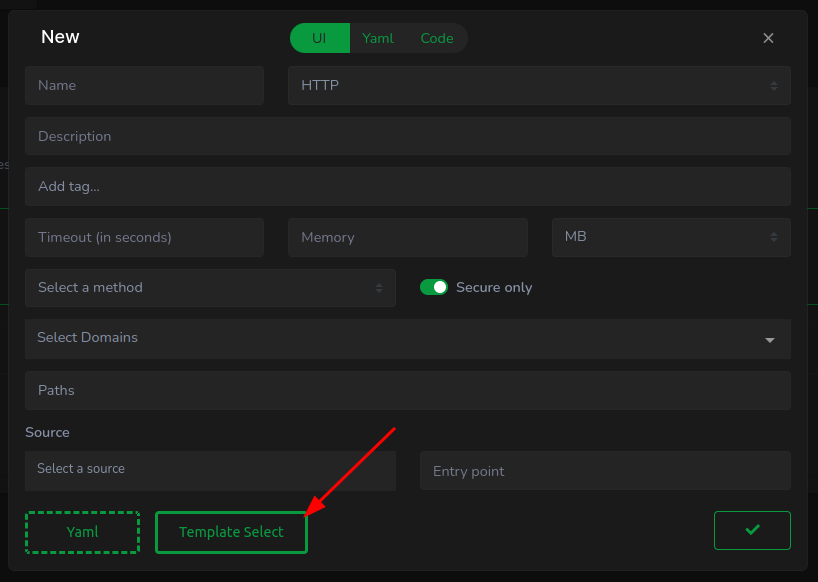
With the modal closed, navigate to the left side menu, (1) click on Functions, then (2) hit the “+” button to concoct a new function.
To expedite the process, (1) press the “Template Select” button.
In the subsequent modal, positioned centrally at the top, (1) pick a programming language—Rust, in this instance, (2) select a template—opting for ping pong, and (3) dismiss the modal.
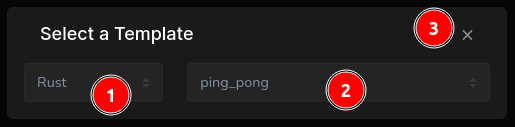
Compiling Rust takes time. For a swifter test, Go is recommended.
Back in the function creation modal, nearly all fields should be prefilled except for the domain. (1) Click on Select Domain, then (2) choose GeneratedDomain, automatically provisioning a domain resource.
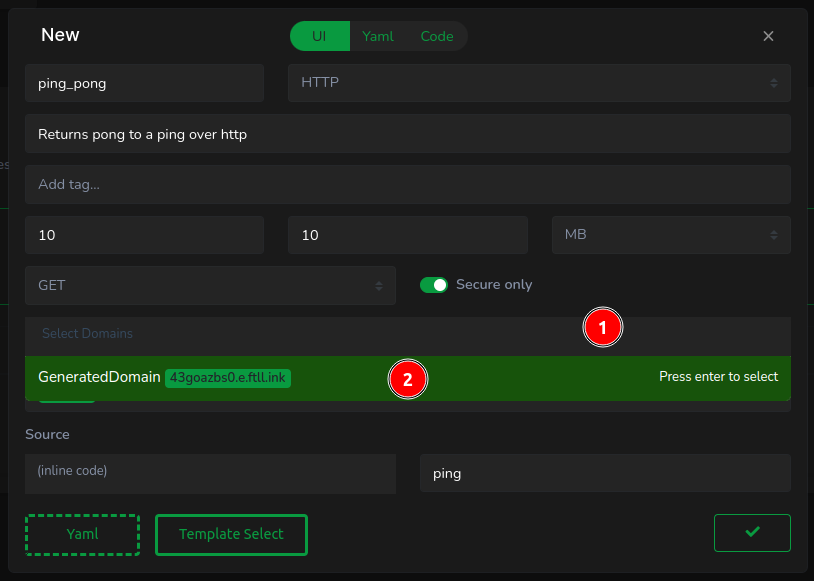
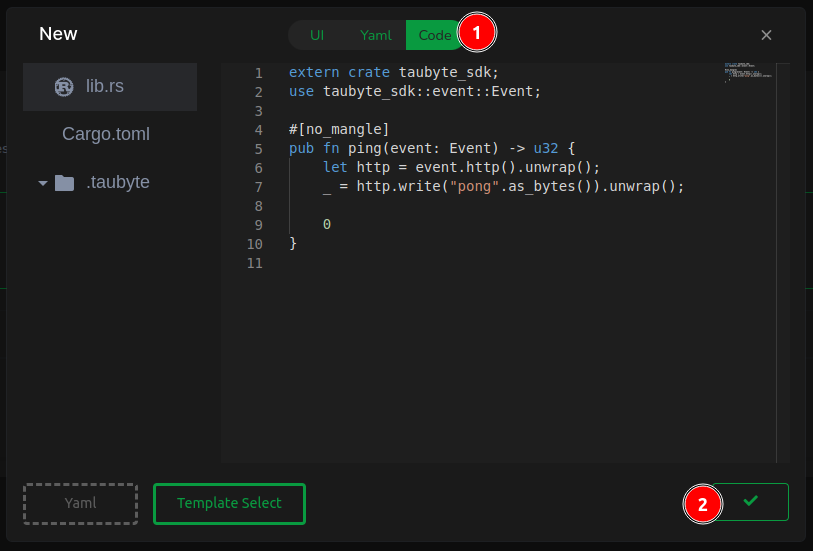
Prior to proceeding, (1) review the code, which should process an HTTP request and return “pong”. Feel free to adjust the message, then (2) confirm the creation of the function by clicking the checkmark button.
Your dashboard will now illustrate your newly minted function.

Unlike conventional clouds, Taubyte leverages Git as the sole source of truth for resource creation. It’s time to commit your changes by clicking the green button located at the bottom right.

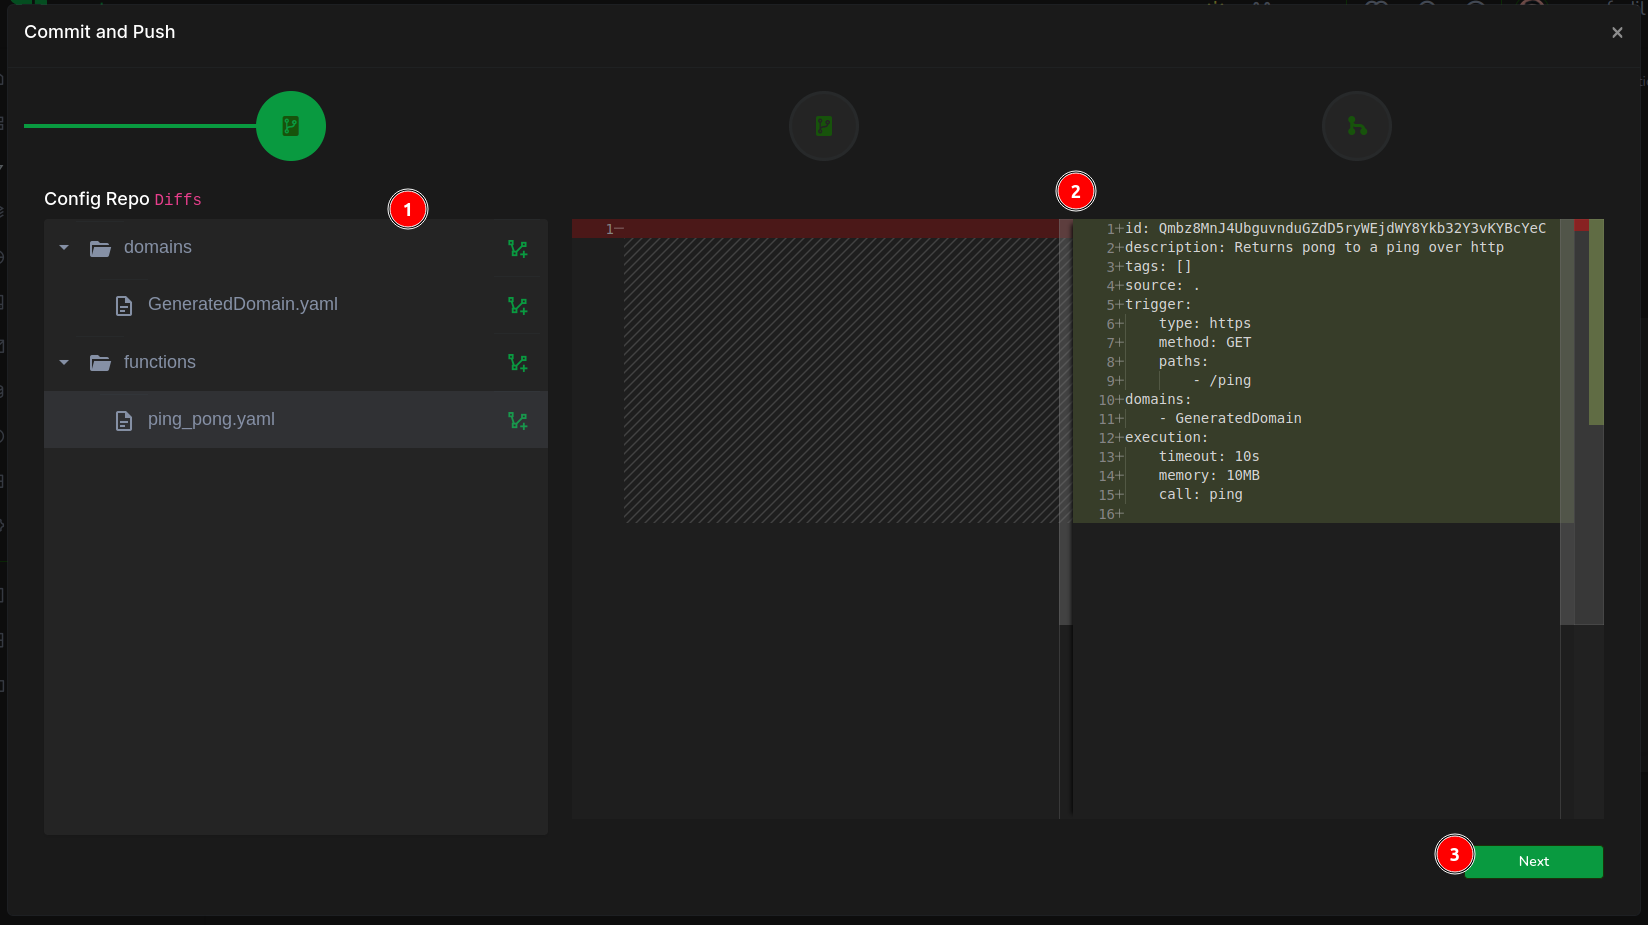
The initial screen presents the diff in the configuration repository. (1) Examine the ping_pong.yaml for function configuration details, then (2) proceed to the next step.
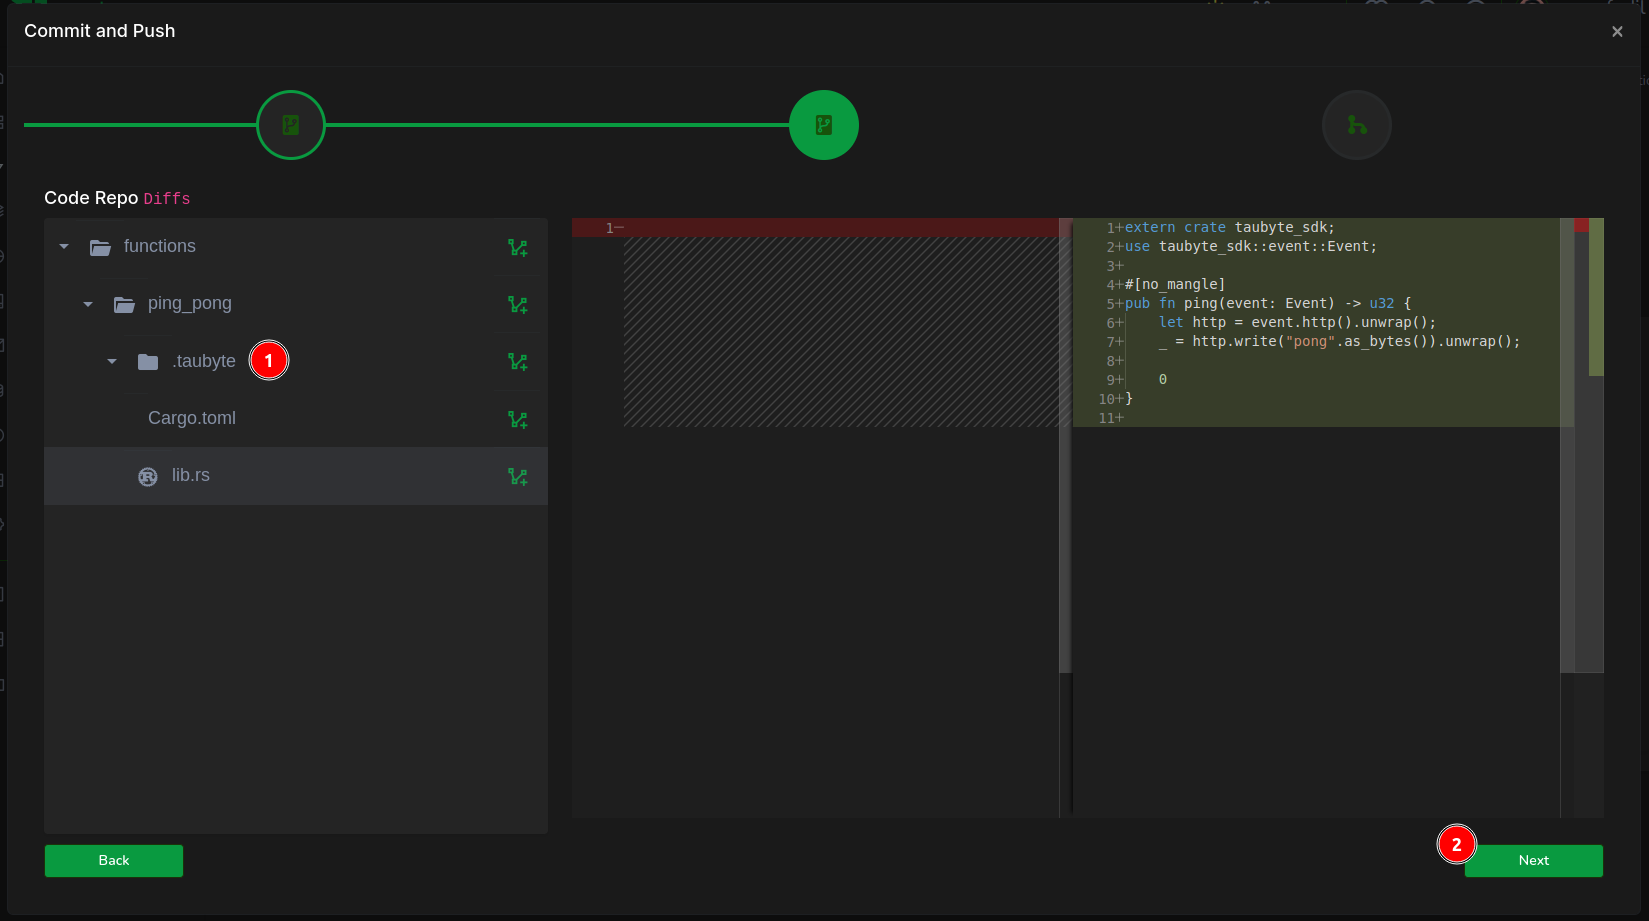
The following screen showcases code changes. By selecting lib.rs, you can inspect your code. Once reviewed, (2) move forward.
Finally, (1) encapsulate your efforts in a commit message, then (2) click on Finish to complete the process.

CI/CD
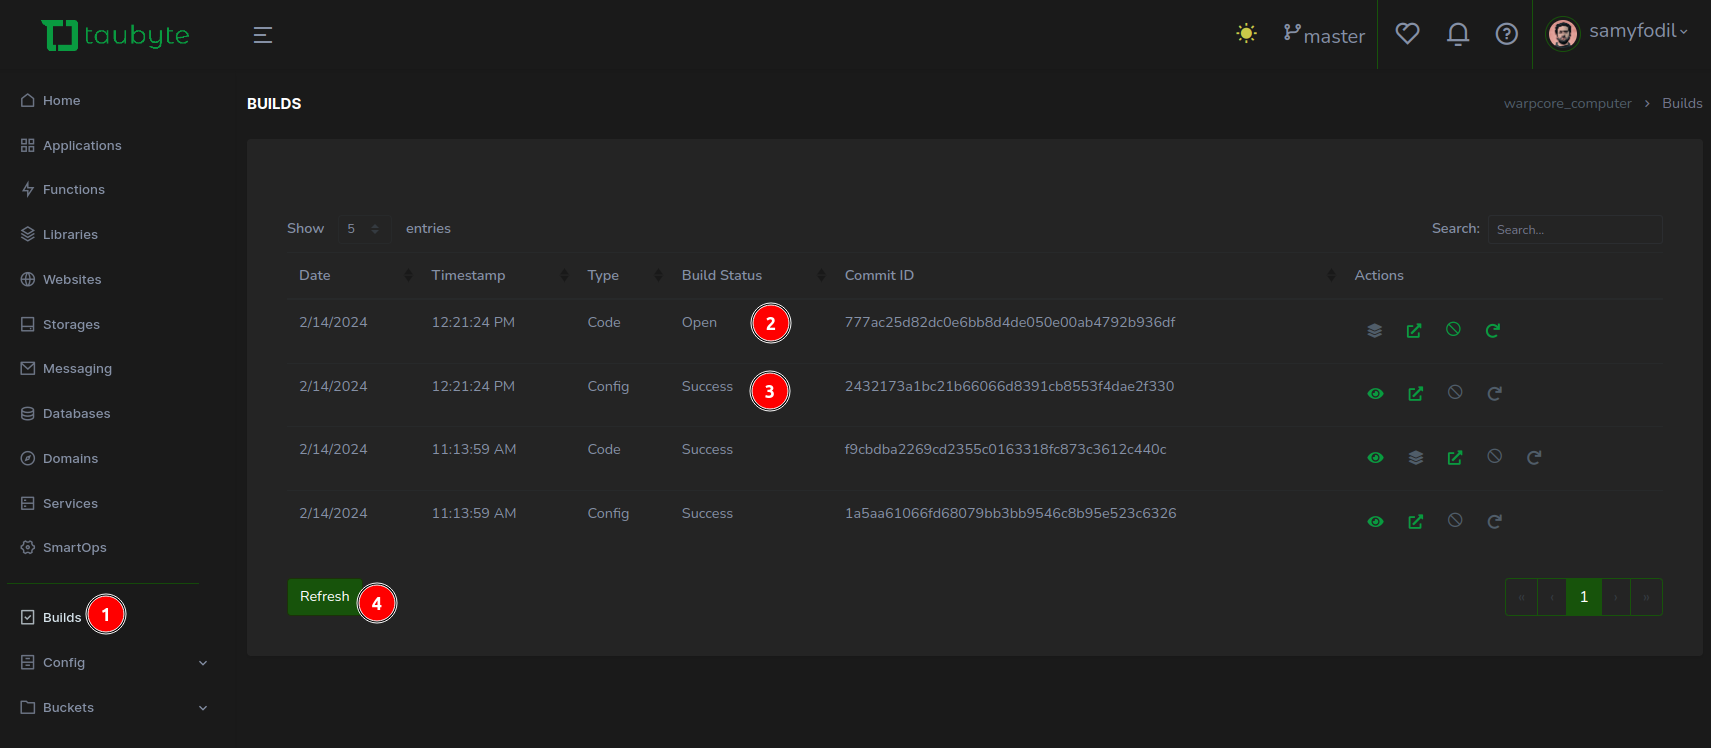
After successfully pushing your changes, these are mirrored in your GitHub repositories. This step initiates CI/CD processes, crucial for deploying and testing your configurations and code. In the Taubyte console, (1) navigate to the Builds section to monitor the progress. Here, you’ll observe two pivotal jobs: (2) one for the configuration build and (3) another for compiling the code. Configuration builds conclude swiftly, whereas code compilation, especially for languages like Rust, will takes some time.
For those with access to their nodes, a top command execution is enlightening. It allows you to witness firsthand which node is executing the build job, identifiable by the cargo process’s appearance at the forefront of system resource consumption.

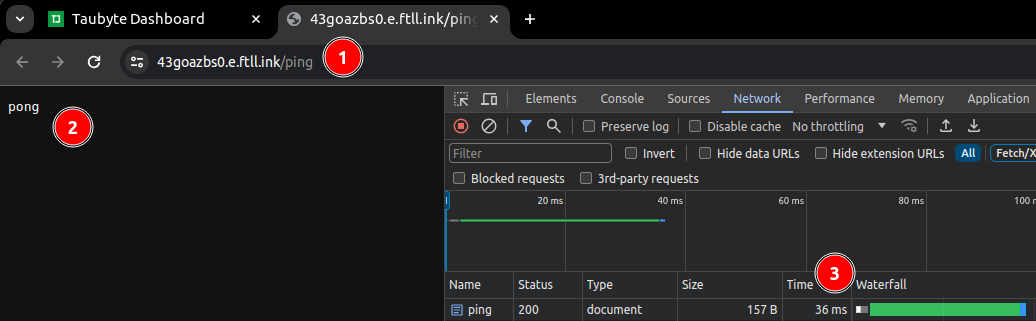
Test the Function
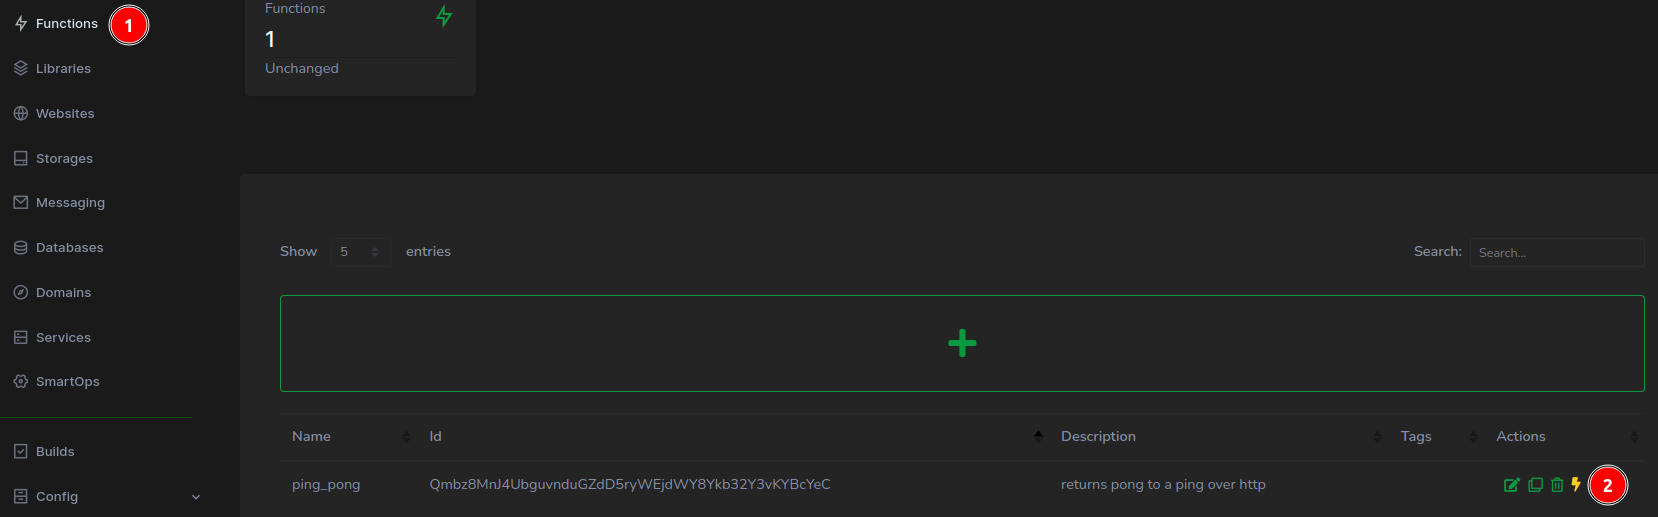
With the build phase complete, it’s time to put your function to the test. From the Taubyte console’s left sidebar, (1) select Functions, then (2) click the thunderbolt icon adjacent to your newly created function.
A new browser tab springs to life, presenting the function’s URL. Key observations include:
- The URL features the generated domain and the
/pingendpoint. - The swift response from the function, echoing back the intended message.
- The impressively brief response time, clocking in at just 36ms.
TLS Certificate
The icing on the cake is the seamless handling of TLS certificates by the Taubyte cloud, automatically procured from Let’s Encrypt. This ensures your function endpoints are not only operational but secure. To appreciate this automated security enhancement, (1) click on the padlock icon located to the left of the URL, then (2) verify the connection’s security status.

This streamlined approach to security underscores Taubyte’s commitment to providing a robust, developer-friendly platform, enabling you to focus on innovation rather than infrastructure.
Conclusion
As we wrap up this journey through the creation and deployment of a serverless function on our very own cloud infrastructure, it’s clear that the barriers to competing with industry giants are not as insurmountable as they once seemed. By leveraging Taubyte’s platform, we’ve demonstrated that with the right tools and a bit of ingenuity, creating a cloud infrastructure capable of hosting scalable, secure, and efficient applications can be achieved with relative ease.
The process outlined in this article—from setting up our initial node to deploying a Rust-based serverless function—illustrates not just the potential for innovation, but the democratization of technology that platforms like Taubyte are fostering. The integration of CI/CD processes, automatic TLS certificate provisioning, and the utilization of Git for configuration and deployment underscore a shift towards more agile, developer-friendly cloud computing solutions.
This exploration is merely the beginning. The cloud you’ve built today lays the foundation for endless possibilities tomorrow. Whether you’re developing APIs, hosting dynamic web applications, or exploring the vast expanse of IoT, the infrastructure is now at your fingertips, ready to scale alongside your ambitions.